Create an Orion Context Broker cluster in High Availability
This documentation describe how to set-up on a generic infrastructure an Orion Context Broker cluster in High Availability.
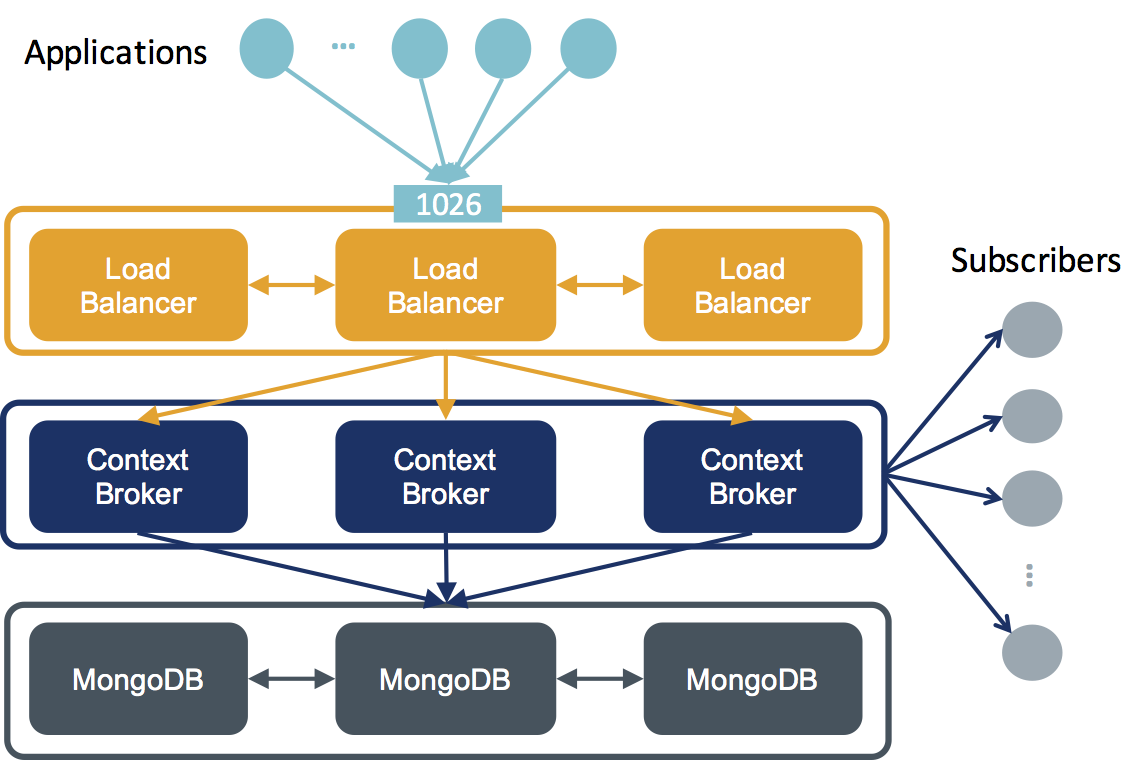
The architecture is made by three logical layers: * A Load Balancer (implemented using HA Proxy) * The Orion Context Broker * The MongoDB ReplicaSet backend
The ideal solution for providing Active-Active access to the HA Proxy cluster (and consequently to the Context Broker) is the adoption of a DNS service that supports multiple IPs for a single name. This will allow clients to use a round-robin solution to pick the actual host to connect with, in case of failure, the second will be used and so on. The alternative is the usage of a VIP mechanism to provide Active-Passive access to the HA Proxy cluster. In this case, the active instance of HA proxy will be only one, in case of a failure of the active HA Proxy, one of the other HA Proxy will take on the Virtual IP.
The picture below present the network architecture of the deployed cluster.
In the following we describe the different steps to configure such a cluster on a set of virtual machines. In docker related documentation, we shortly discuss how to create the same architecture leveraging on a Docker Swarm cluster.
Services configuration
The configuration discussed below assume you have one server per each box represented in the architecture. Of course, different layers, e.g. HA Proxy and Context Broker can be combined together on a single server.
Requirements: * 3 VMs running Centos for the Context Broker layer. * 6 VMs running Ubuntu 16.04 LTS for the HA Proxy and MongoDB layers.
MongoDB configuration
For each server:
-
Configure the Firewall to block access from outside the local network except for SSH and on local network for 27017
```bash $ nano /etc/iptables.rules
*filter :INPUT DROP [0:0] :FORWARD ACCEPT [0:0] :OUTPUT ACCEPT [0:0] :LOGGING - [0:0]
COMMIT
-A INPUT -m state --state RELATED,ESTABLISHED -j ACCEPT -A INPUT -p icmp -s 10.0.64.0/25 -j ACCEPT -A INPUT -i lo -j ACCEPT -A INPUT -m state --state NEW -m tcp -p tcp --dport 27017 -s 10.0.64.0/25 -j ACCEPT -A INPUT -p tcp -m state --state NEW -m tcp --dport 22 -j ACCEPT COMMIT
$ iptables-restore < /etc/iptables.rules ```
-
Configure the hosts file to include local network hostname resolution
```bash $ nano /etc/hosts
10.0.64.32 mongo1 10.0.64.33 mongo2 10.0.64.34 mongo3
10.0.64.35 contextbroker1 10.0.64.36 contextbroker2 10.0.64.37 contextbroker3
10.0.64.38 proxy1 10.0.64.39 proxy2 10.0.64.40 proxy3 ```
-
Install MongoDB 3.2 using the following commands. WARNING: this test was done when Mongo DB 3.2 was supported in Orion, test should be redone with the current version.
```bash $ sudo apt-key adv --keyserver hkp://keyserver.ubuntu.com:80 --recv EA312927 $ echo "deb http://repo.mongodb.org/apt/ubuntu xenial/mongodb-org/3.2 multiverse" | sudo tee /etc/apt/sources.list.d/mongodb-org-3.2.list
$ sudo apt-get update
$ sudo apt-get install -y mongodb-org ```
-
Define the ReplicaSet configuration in the MongoDb configuration file
/etc/mongodb.conf, comment thebindIpdirective to allow connection fromlocalhostand10.0.64.0/25network:```bash $ nano /etc/mongodb.conf
mongod.conf
for documentation of all options, see:
http://docs.mongodb.org/manual/reference/configuration-options/
Where and how to store data.
storage: dbPath: /var/lib/mongodb journal: enabled: true
engine:
mmapv1:
wiredTiger:
where to write logging data.
systemLog: destination: file logAppend: true path: /var/log/mongodb/mongod.log
network interfaces
net: port: 27017
bindIp: 10.0.64.32
replication: replSetName: contextBroker ```
-
Start all the MongoDB
bash
service mongod start
On the primary node (you choose, during the set-up it was used mongo1):
-
Set the export lang
bash EXPORT LC_ALL=C -
Connect to mongodb
bash mongo -
Provide the configuration of the Primary node
config = { _id: "contextBroker", members: [ { _id: 0, host: "mongo1:27017" } ] -
Initialise the replica set
rs.initiate(config); -
Add the other nodes
rs.add("mongo2:27017"); rs.add("mongo3:27017"); -
Check that the status of the cluster is correct
``` rs.status();
{ "set" : "contextBroker", "date" : ISODate("2017-02-02T17:25:57.605Z"), "myState" : 2, "term" : NumberLong(5), "syncingTo" : "mongo2:27017", "heartbeatIntervalMillis" : NumberLong(2000), "members" : [ { "_id" : 0, "name" : "mongo1:27017", "health" : 1, "state" : 2, "stateStr" : "SECONDARY", "uptime" : 3967, "optime" : { "ts" : Timestamp(1486052399, 1), "t" : NumberLong(5) }, "optimeDate" : ISODate("2017-02-02T16:19:59Z"), "syncingTo" : "mongo2:27017", "configVersion" : 3, "self" : true }, { "_id" : 1, "name" : "mongo3:27017", "health" : 1, "state" : 2, "stateStr" : "SECONDARY", "uptime" : 3929, "optime" : { "ts" : Timestamp(1486052399, 1), "t" : NumberLong(5) }, "optimeDate" : ISODate("2017-02-02T16:19:59Z"), "lastHeartbeat" : ISODate("2017-02-02T17:25:55.622Z"), "lastHeartbeatRecv" : ISODate("2017-02-02T17:25:55.622Z"), "pingMs" : NumberLong(0), "syncingTo" : "mongo1:27017", "configVersion" : 3 }, { "_id" : 2, "name" : "mongo2:27017", "health" : 1, "state" : 1, "stateStr" : "PRIMARY", "uptime" : 3967, "optime" : { "ts" : Timestamp(1486052399, 1), "t" : NumberLong(5) }, "optimeDate" : ISODate("2017-02-02T16:19:59Z"), "lastHeartbeat" : ISODate("2017-02-02T17:25:55.623Z"), "lastHeartbeatRecv" : ISODate("2017-02-02T17:25:55.623Z"), "pingMs" : NumberLong(0), "electionTime" : Timestamp(1486052398, 1), "electionDate" : ISODate("2017-02-02T16:19:58Z"), "configVersion" : 3 } ], "ok" : 1 } ```
Context Broker configuration
For each server:
-
Configure the Firewall to block access from outside the local network except for SSH and on local network for 1026
```bash $ nano /etc/sysconfig/iptables
Firewall configuration written by system-config-firewall
Manual customization of this file is not recommended.
*filter :INPUT ACCEPT [0:0] :FORWARD ACCEPT [0:0] :OUTPUT ACCEPT [0:0] -A INPUT -m state --state ESTABLISHED,RELATED -j ACCEPT -A INPUT -p icmp -j ACCEPT -A INPUT -i lo -j ACCEPT -A INPUT -m state --state NEW -m tcp -p tcp --dport 1026 -s 10.0.64.0/25 -j ACCEPT -A INPUT -m state --state NEW -m tcp -p tcp --dport 22 -j ACCEPT -A INPUT -j REJECT --reject-with icmp-host-prohibited -A FORWARD -j REJECT --reject-with icmp-host-prohibited COMMIT
$ iptables-restore < /etc/sysconfig/iptables ```
-
Configure the hosts file to include local network hostname resolution
```bash $ nano /etc/hosts
10.0.64.32 mongo1 10.0.64.33 mongo2 10.0.64.34 mongo3
10.0.64.35 contextbroker1 10.0.64.36 contextbroker2 10.0.64.37 contextbroker3
10.0.64.38 proxy1 10.0.64.39 proxy2 10.0.64.40 proxy3 ```
-
Install the Context Broker with the following commands
```bash $ nano /etc/yum.repos.d/fiware.repo
[fiware] name=Fiware Repository baseurl=http://repositories.lab.fiware.org/repo/rpm/$releasever gpgcheck=0 enabled=1
$ yum install contextBroker ```
-
Configure the Context Broker by listing all the mongodb hosts and the name of the replica set
```bash $ nano /etc/sysconfig/contextBroker
BROKER_DATABASE_HOST=mongo1,mongo2,mongo3 BROKER_DATABASE_RPLSET=contextBroker ```
-
Start the Context Broker
bash $ /etc/init.d/contextBroker start -
Test the Context Broker
bash
$ curl localhost:1026/version -s -S
HA Proxy Configuration
-
Configure the Firewall to block access from outside the local network except for SSH and for the 1026 that will be used to load balance Context Broker traffic
```bash $ nano /etc/iptables.rules
*filter :INPUT DROP [0:0] :FORWARD ACCEPT [0:0] :OUTPUT ACCEPT [0:0] :LOGGING - [0:0]
COMMIT
-A INPUT -m state --state RELATED,ESTABLISHED -j ACCEPT -A INPUT -p icmp -s 10.0.64.0/25 -j ACCEPT -A INPUT -i lo -j ACCEPT -A INPUT -m state --state NEW -m tcp -p tcp --dport 1026 -j ACCEPT -A INPUT -p tcp -m state --state NEW -m tcp --dport 22 -j ACCEPT COMMIT
$ iptables-restore < /etc/iptables.rules ```
-
Configure the hosts file to include local network hostname resolution
```bash $ nano /etc/hosts
10.0.64.32 mongo1 10.0.64.33 mongo2 10.0.64.34 mongo3
10.0.64.35 contextbroker1 10.0.64.36 contextbroker2 10.0.64.37 contextbroker3
10.0.64.38 proxy1 10.0.64.39 proxy2 10.0.64.40 proxy3 ```
-
Install the HA Proxy
bash $ sudo apt-get install haproxy -
Configure the HA Proxy
```bash $ nano /etc/haproxy/haproxy.cfg
frontend www bind *:1026 default_backend ctx_pool
backend ctx_pool balance roundrobin mode http server ctx1 contextbroker1:1026 check server ctx2 contextbroker2:1026 check server ctx3 contextbroker3:1026 check ```
-
Enable the automatic restart of HA Proxy on reboot
```bash $ nano /etc/default/haproxy
ENABLED=1 ```
-
Start the HA Proxy
bash $ service haproxy reload -
Test the HA Proxy
bash
$ curl localhost:1026/version -s -S